To connect the Navistep unit, use a standard USB-C power cable plugged into a permanent USB-C power source on your sailboat (0.5 Ah recommended). For owners of older units, connect the positive (+) and negative (-) terminals to a 12V DC power source on your sailboat.
This procedure only needs to be followed once, unless you change your Wi-Fi router.
Start the Navistep unit and wait until the yellow LED appears. This LED indicates that the Navistep Wi-Fi and local web server are running.
On your smartphone or computer, select the Navistep Wi-Fi access point, then enter the following Navistep Wi-Fi access point password: navistep123
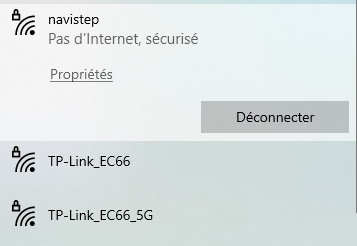
Once this password has been accepted, you should see the following active Navistep Wi-Fi connection:
Note that with this Navistep Wi-Fi connection you do not yet have internet access. This is normal: this local Navistep Wi-Fi connection will then allow you to select, through a local web page, an internet router and associate it with your Navistep unit. This will then turn your Navistep unit into an internet Wi-Fi hotspot for GPS tracking.
Once this Navistep Wi-Fi connection is active, if you have the Android application navistep_admin, launch it. Otherwise, enter the following address in your internet browser: http://10.11.12.13
The Android application “navistep_admin” saves you from typing http://10.11.12.13 in your browser and makes it easier to navigate through the administration pages of your Navistep unit.
After the first launch, you will see the same page for associating your Navistep unit with your Wi-Fi router, either in the Android application or in your browser page:
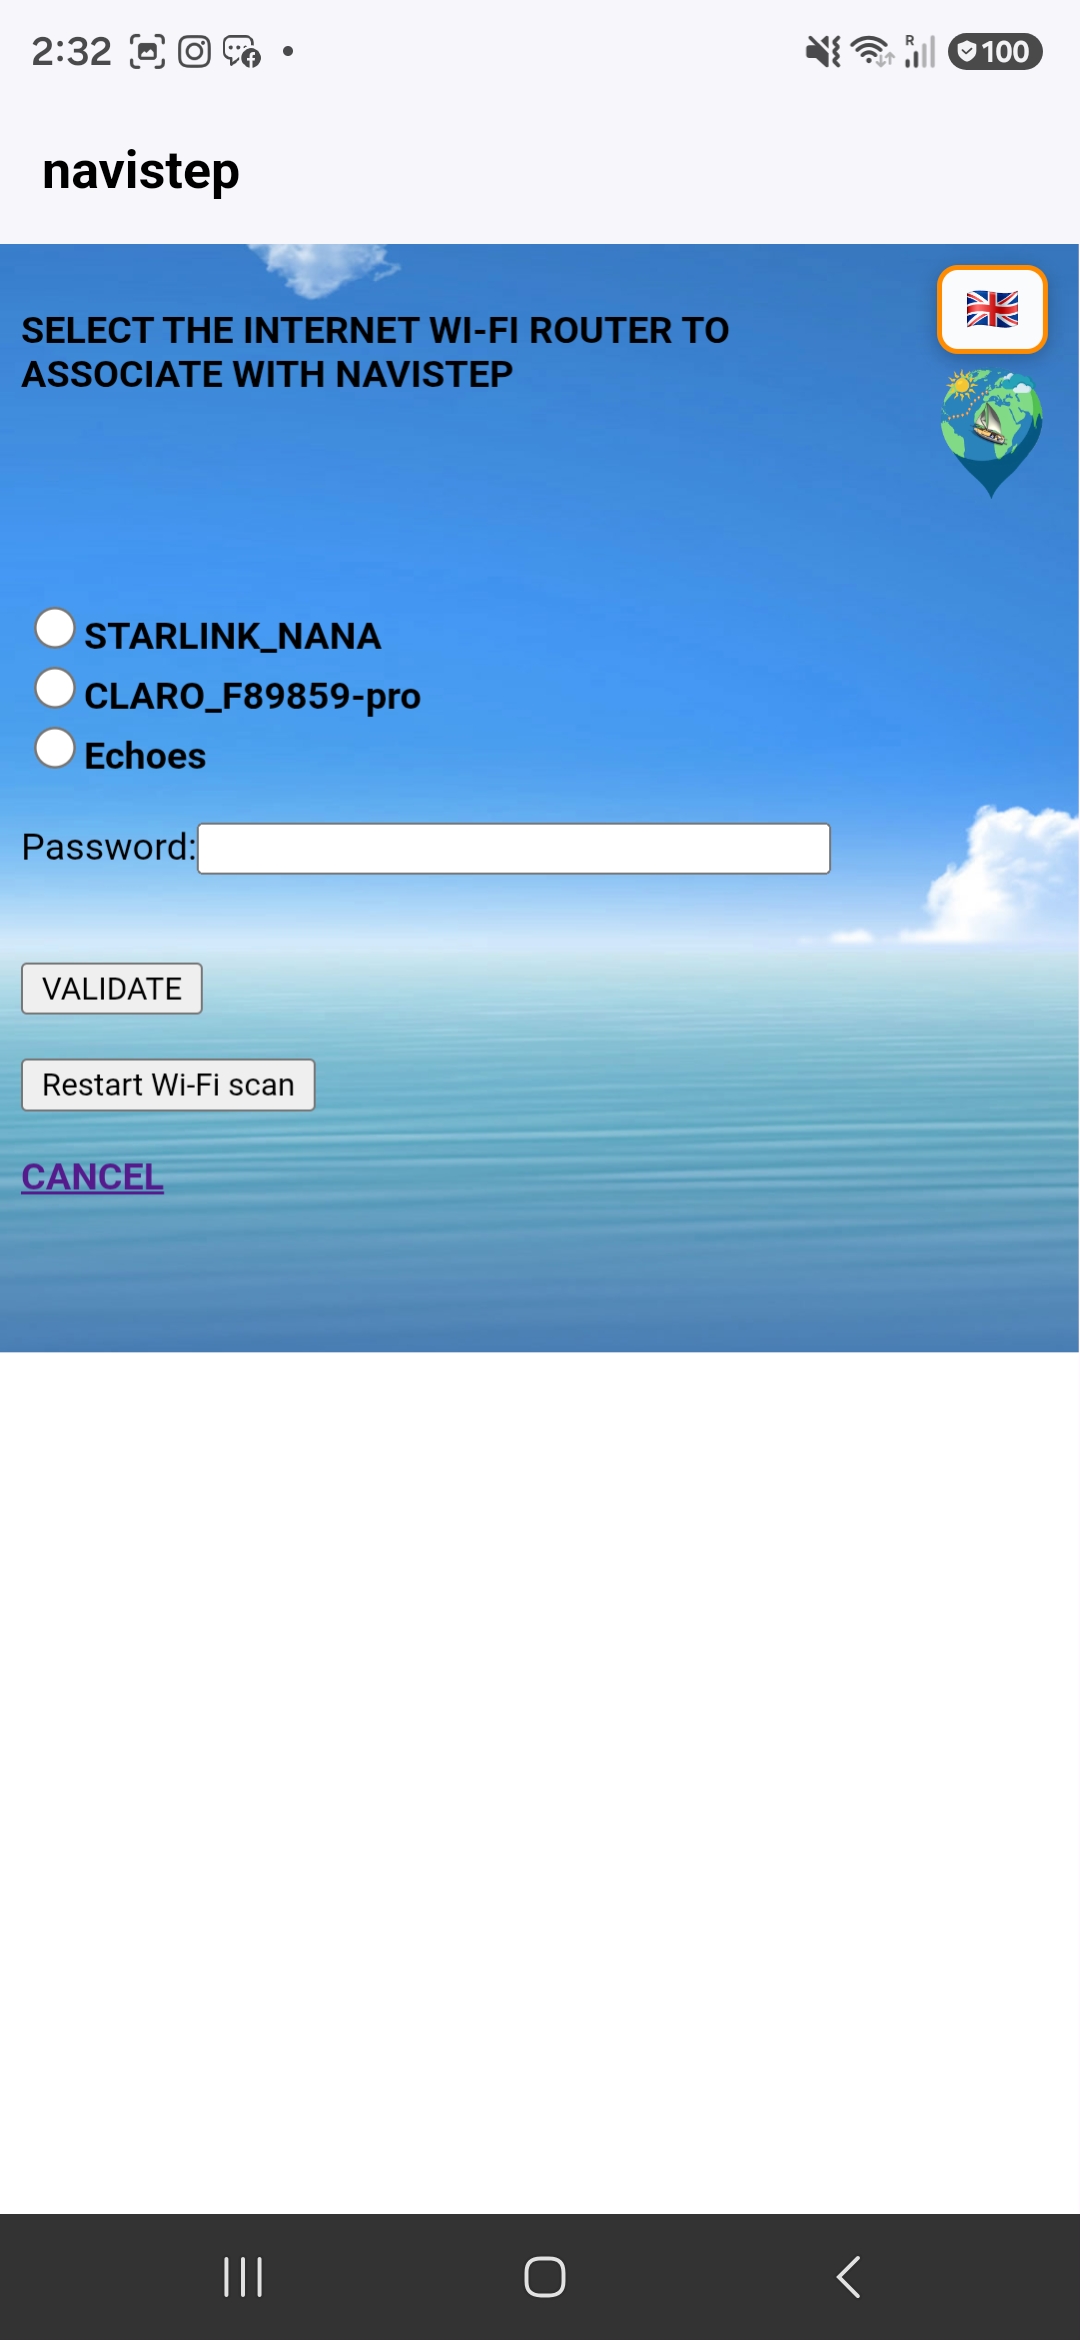
Select your internet Wi-Fi router (STARLINK or another router), enter its password, which you must know, and validate.
After selecting the Wi-Fi router, entering its password and validating, if you are using a browser you will reach this page, which indicates that your new Wi-Fi configuration will be applied after restarting the Navistep unit.
You must follow these instructions: close your browser, wait for a short while, (about 2 min.) then reconnect to the Navistep Wi-Fi access point, which should now appear with an internet connection.
The initialization procedure for the Navistep unit is simpler with the Android application.
After validating the association of your Navistep unit with an internet Wi-Fi router, a loader appears in the “navistep_admin” application and you only need to follow the instructions.
After your Navistep unit restarts with its new settings, in all cases you must reconnect to your local Navistep Wi-Fi.
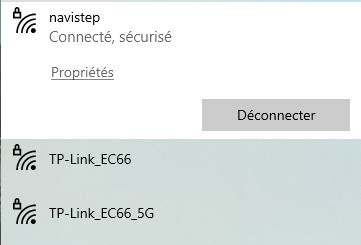
If you see the status “Connected” in your Navistep Wi-Fi connection, it means that your Navistep unit is correctly associated with the internet Wi-Fi router you selected in the previous step. Your Navistep unit is now acting as an internet hotspot.
This internet hotspot function allows your Navistep unit to continuously send your GPS position to the internet, so that friends and relatives can follow your trip in real time, for example during an Atlantic crossing by sailboat.
In this case, if you relaunch your browser and enter the address http://10.11.12.13 again, or if you relaunch the Android application, you will access this first blank configuration page for your Navistep Tracking:
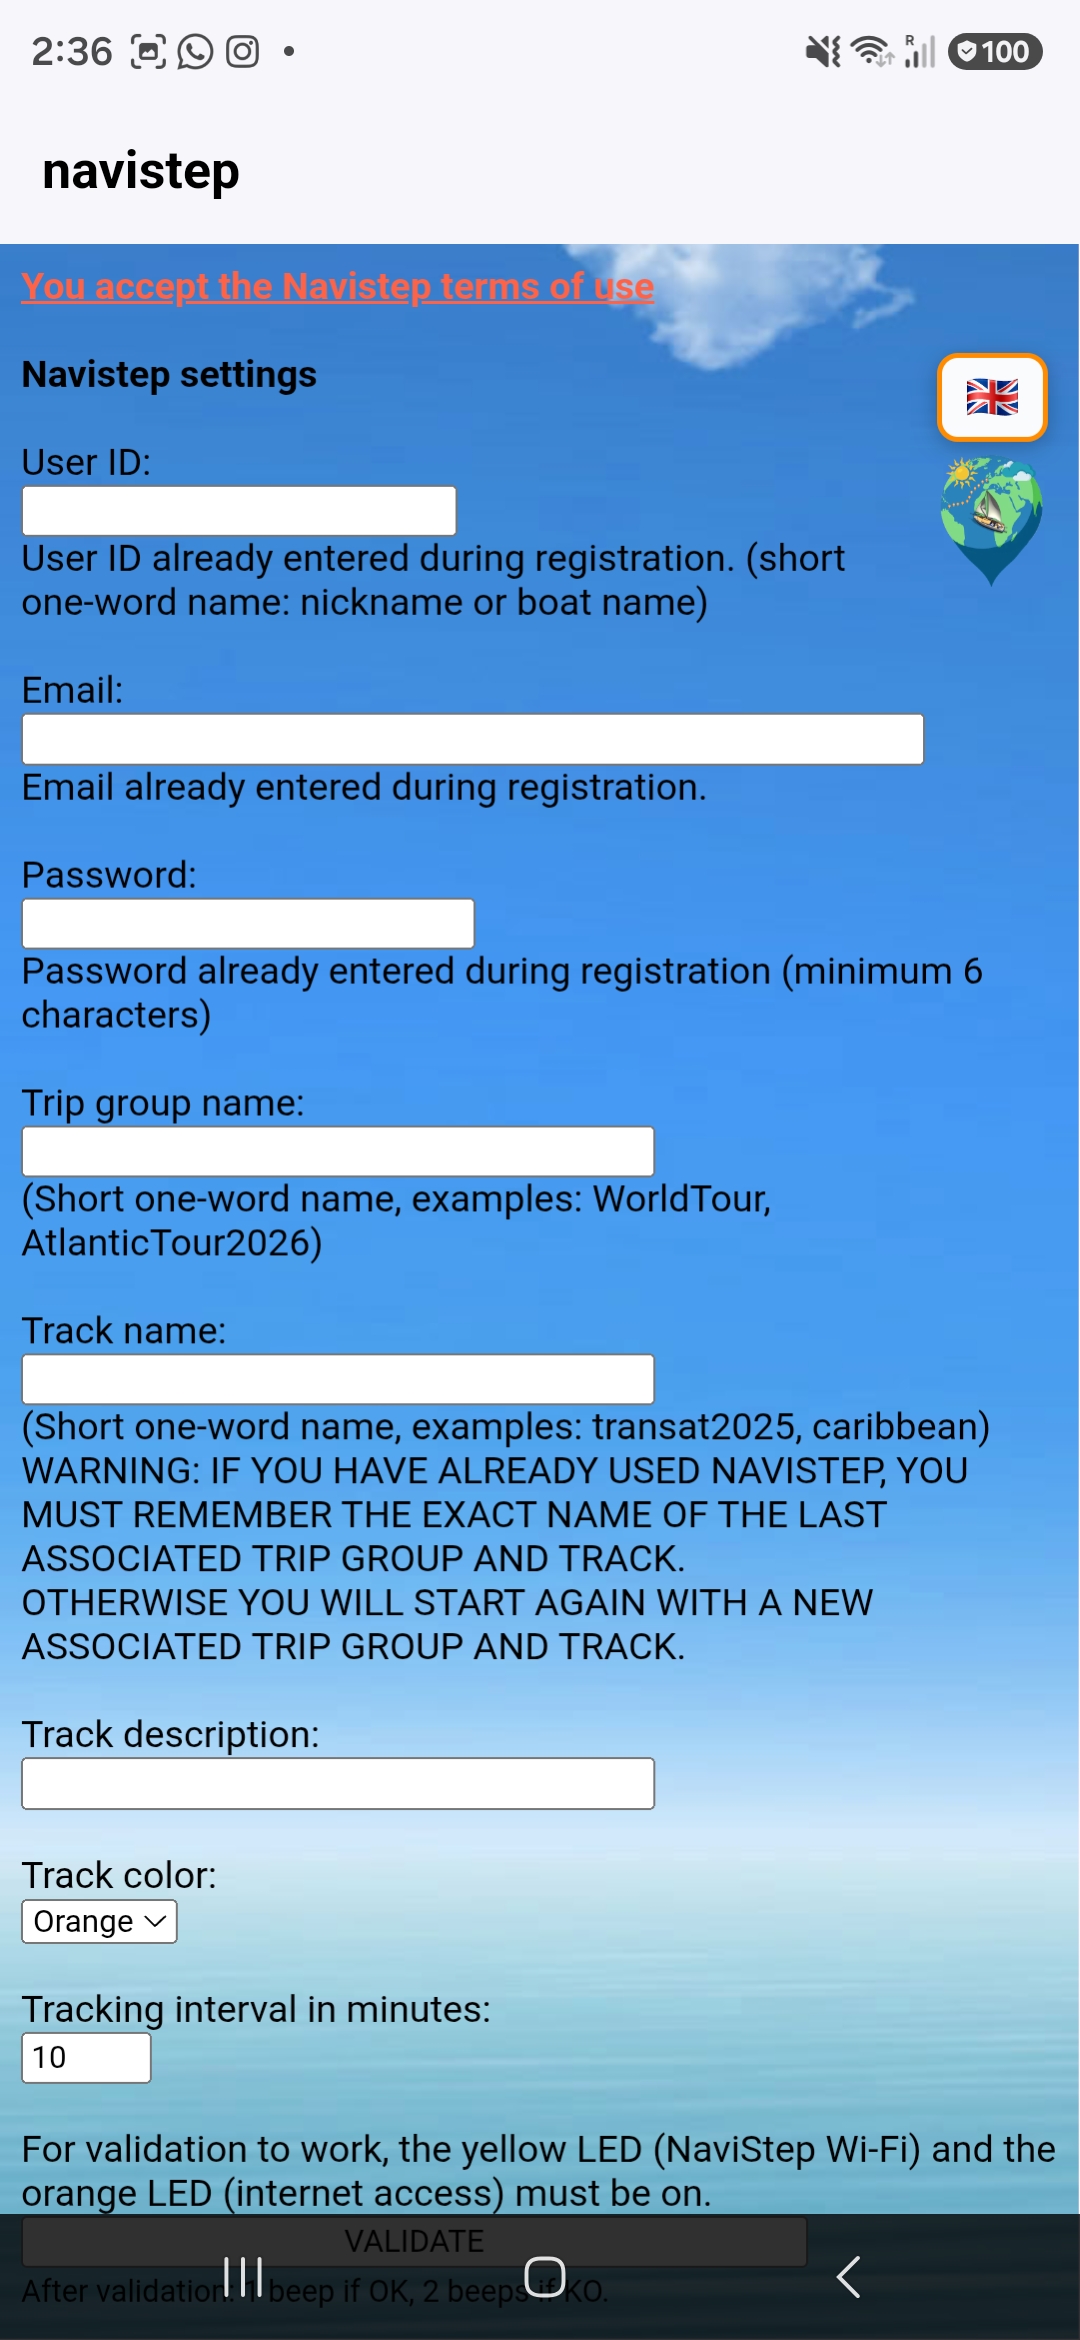
You must enter exactly the same email identifier and password that you previously entered on the navistep.net website when you registered with Navistep.
You must also enter the following settings: Trip name, Track name, Track description, color, and tracking frequency.
Once these first settings have been validated, you then access the following final page:
Main Navistep configuration page, both in your browser and in the Android “navistep_admin” application:
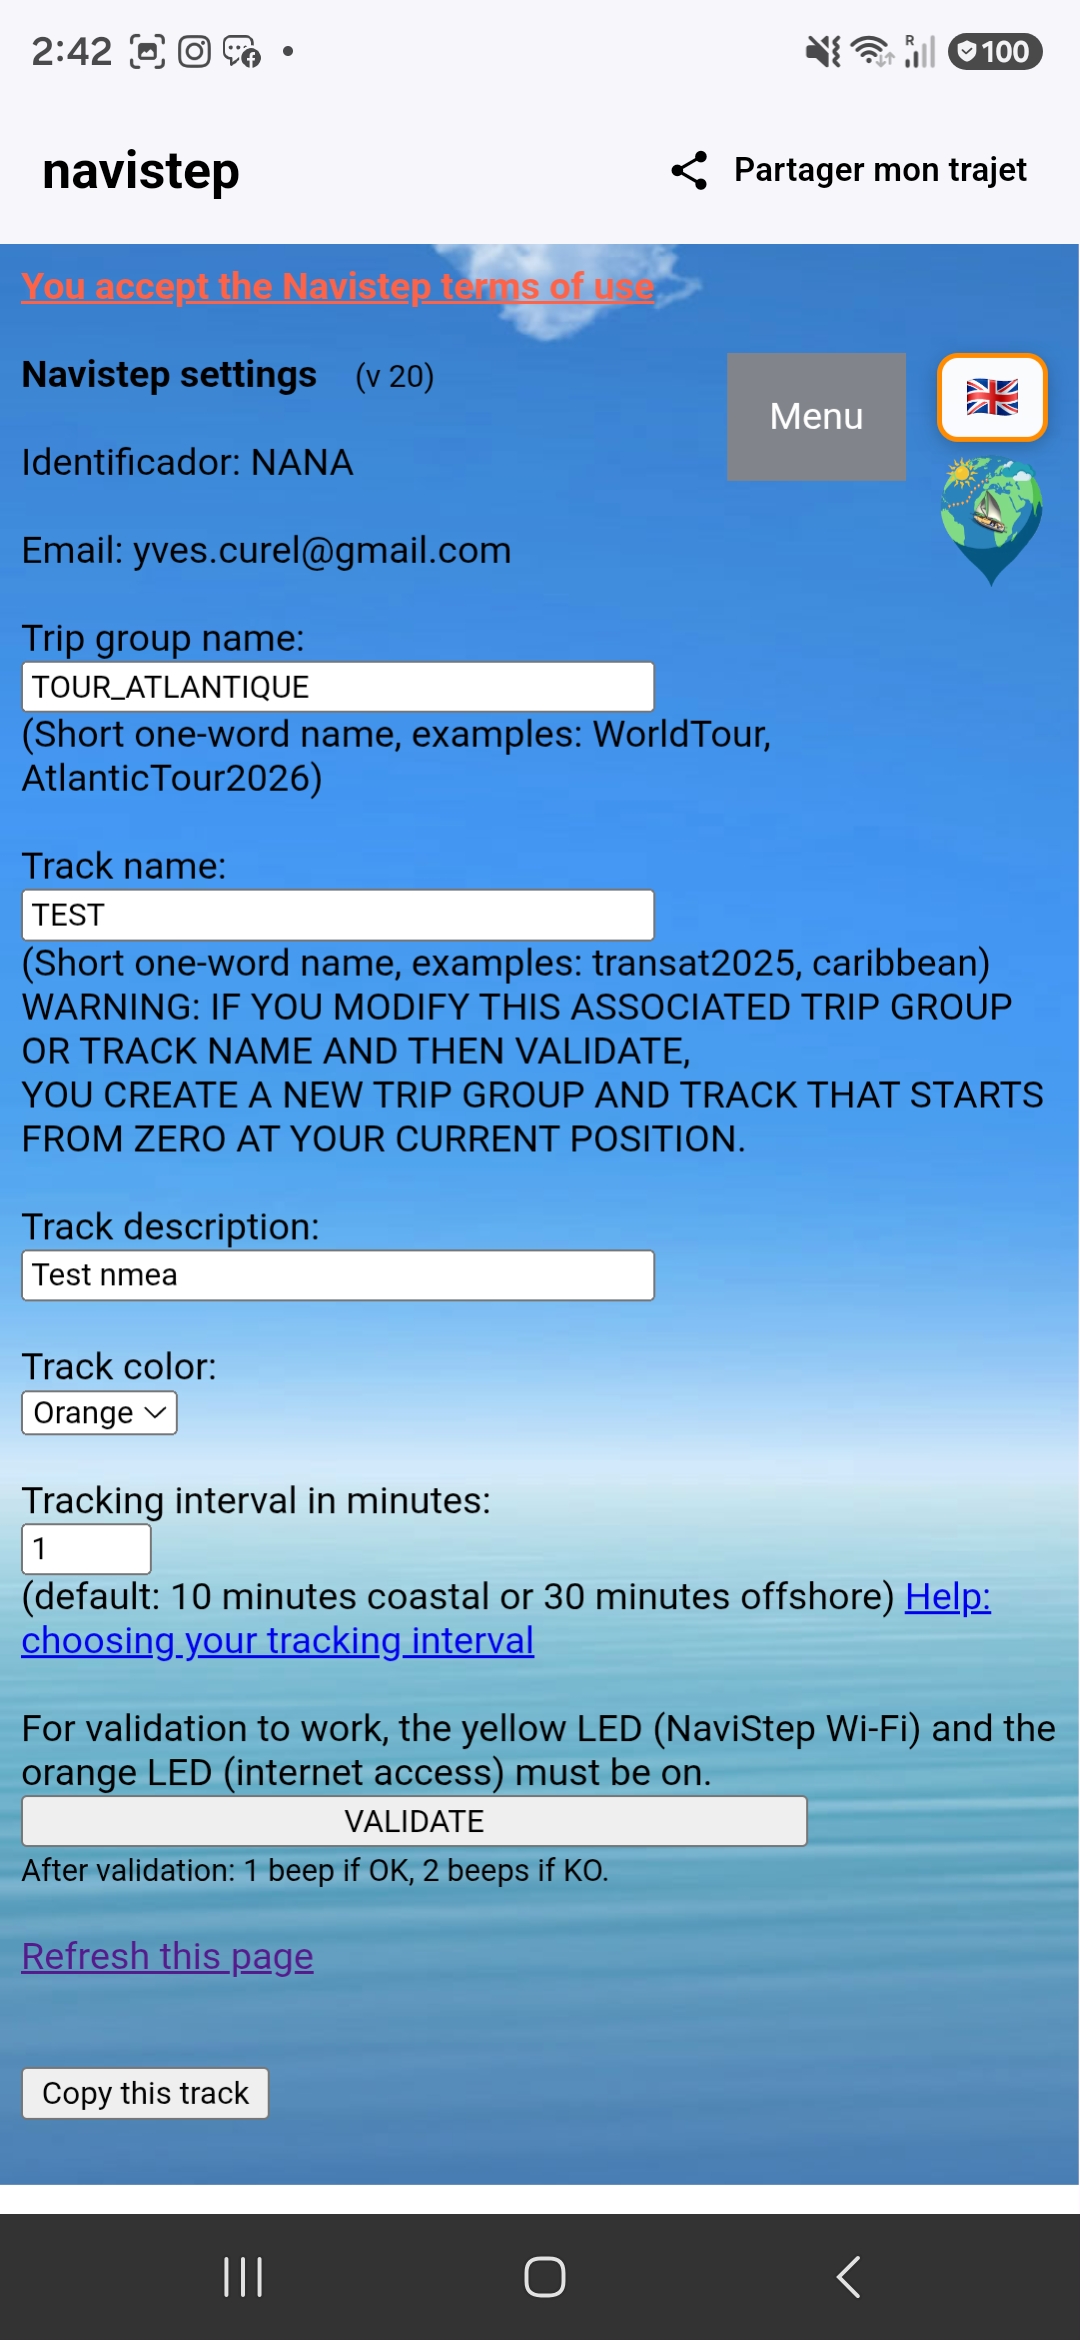
Example shown here: a 10-minute tracking interval for coastal sailing.
This page allows you to modify your GPS tracking settings at any time. These settings are dynamically taken into account by the Navistep GPS tracking service.
Therefore, if you change the tracking frequency, it will be taken into account immediately by the Navistep GPS tracking service after validation.
Navistep supports multiple tracks. If you change the track name and its associated description, Navistep GPS tracking will automatically start on a new track after validation, and a new internet tracking page will be created with a URL containing the name of your new track.
You can then give this URL or internet link to the people following you, so they can follow you in real time on an online map page showing your route.
The Copy this track button at the bottom allows you to copy this internet link and provide it to anyone following your trip. You can then paste this link, for example, into WhatsApp or into an email to the recipients following your trip.
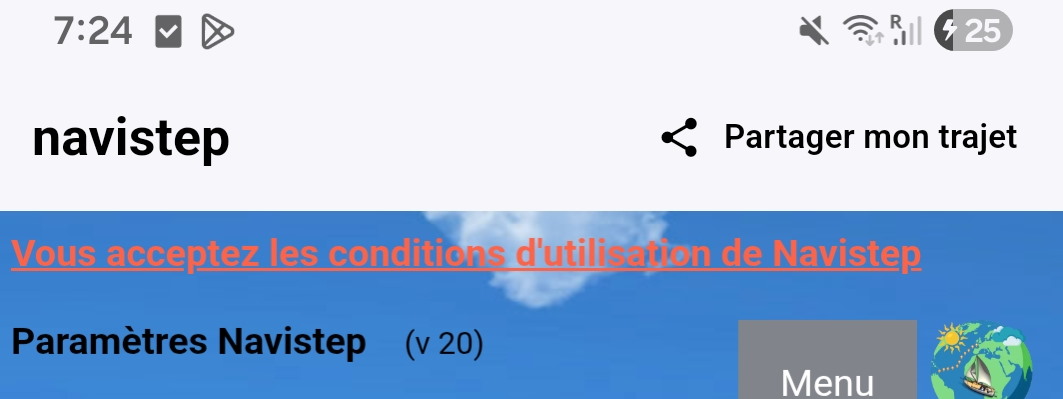
In the Android application, sharing is made easier by the button at the top left: Share my track.
Clicking Share my track allows you to share the link to your current trip through WhatsApp, email, Facebook, etc.
Navistep has a very open data model for long trips.
You can create several trips, and each trip can contain multiple tracks.
If you have a very long journey and want to split it into several major stages, Navistep allows you to do so. Here is a concrete example:
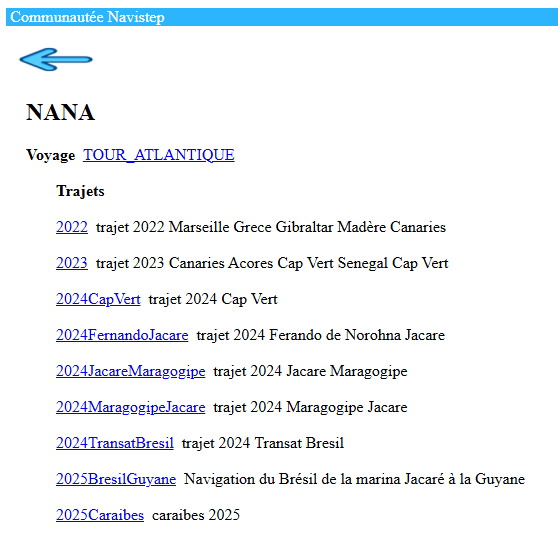
On this user summary web page, accessible at https://navistep-marine.web.app/recap.html, click on a sailboat name and then on the small globe icon showing its trips and tracks. You can see a long trip with multiple tracks.
If you add a new track to this trip, the Navistep tracker starts again from zero on this new track, and it will be added to the previous tracks.
Once the main Navistep settings have been defined, you can simply use it to share the route of your trip on the internet without touching anything again. But you can also go further.
This right-hand menu provides access to other Navistep features:
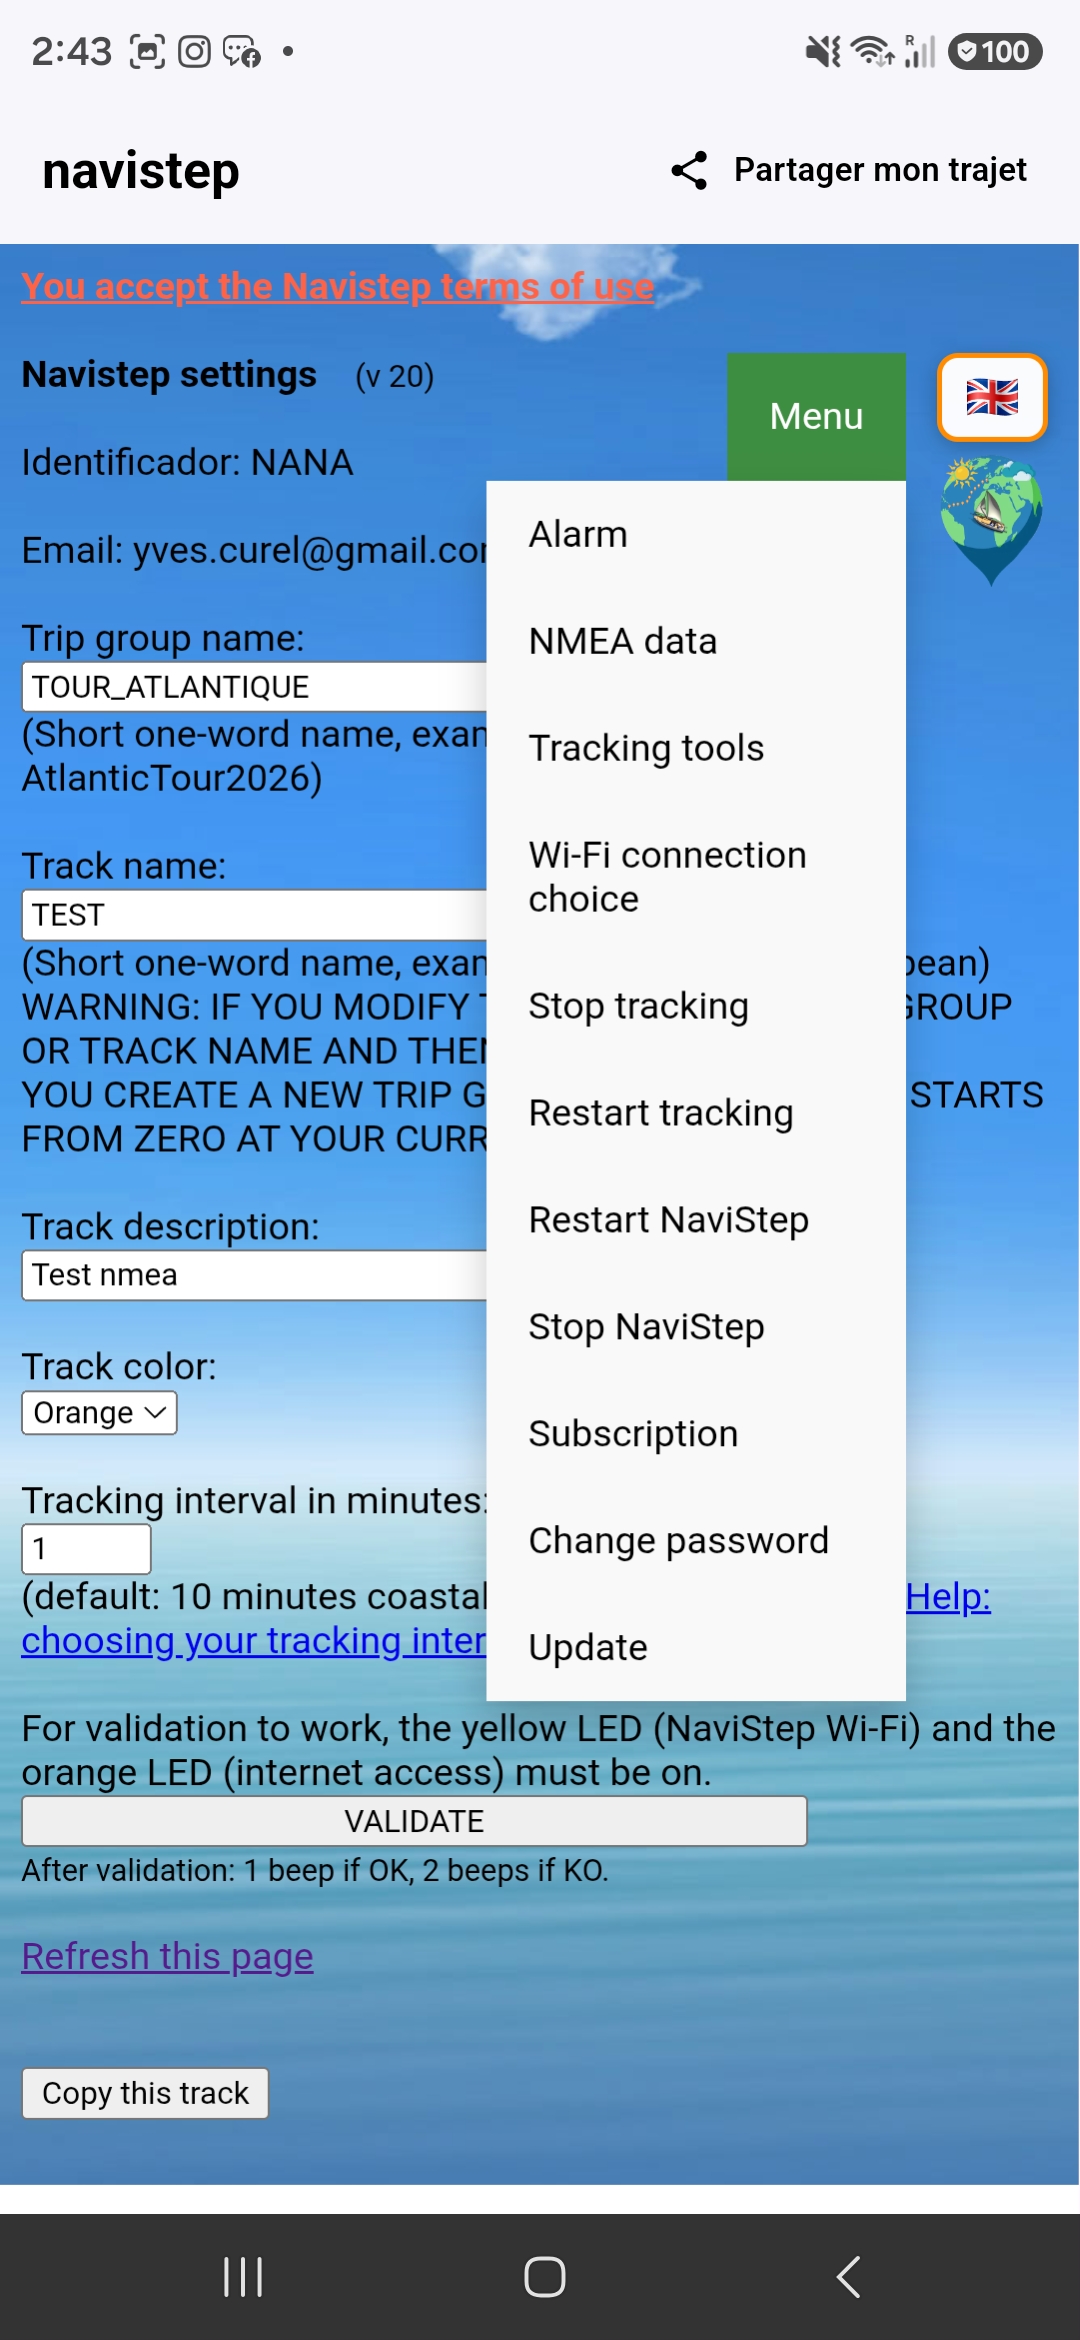
Tracking follow-up provides a set of utilities related to your current GPS tracking: view trace and error files, export your GPS tracks in .csv format for spreadsheet viewing or in .gpx format for map viewing, and recover and add data that was not saved online.
Alarm allows you to configure a monitoring alarm over a long period, or an anchor alarm if you are on a sailboat.
Wi-Fi connection selection allows you to connect another Wi-Fi router to your Navistep unit.
Stop Tracking temporarily stops the GPS tracking service, for example when the sailboat is stopped in a port, without shutting down the Navistep unit.
Restart Tracking restarts the GPS tracking service.
Restart Navistep reboots the Navistep unit.
Change password allows you to change your password. This is useful, for example, if you want to renew your Navistep subscription on navistep.net but have forgotten your password.
Shut down Navistep shuts down the Navistep unit before cutting its power supply.
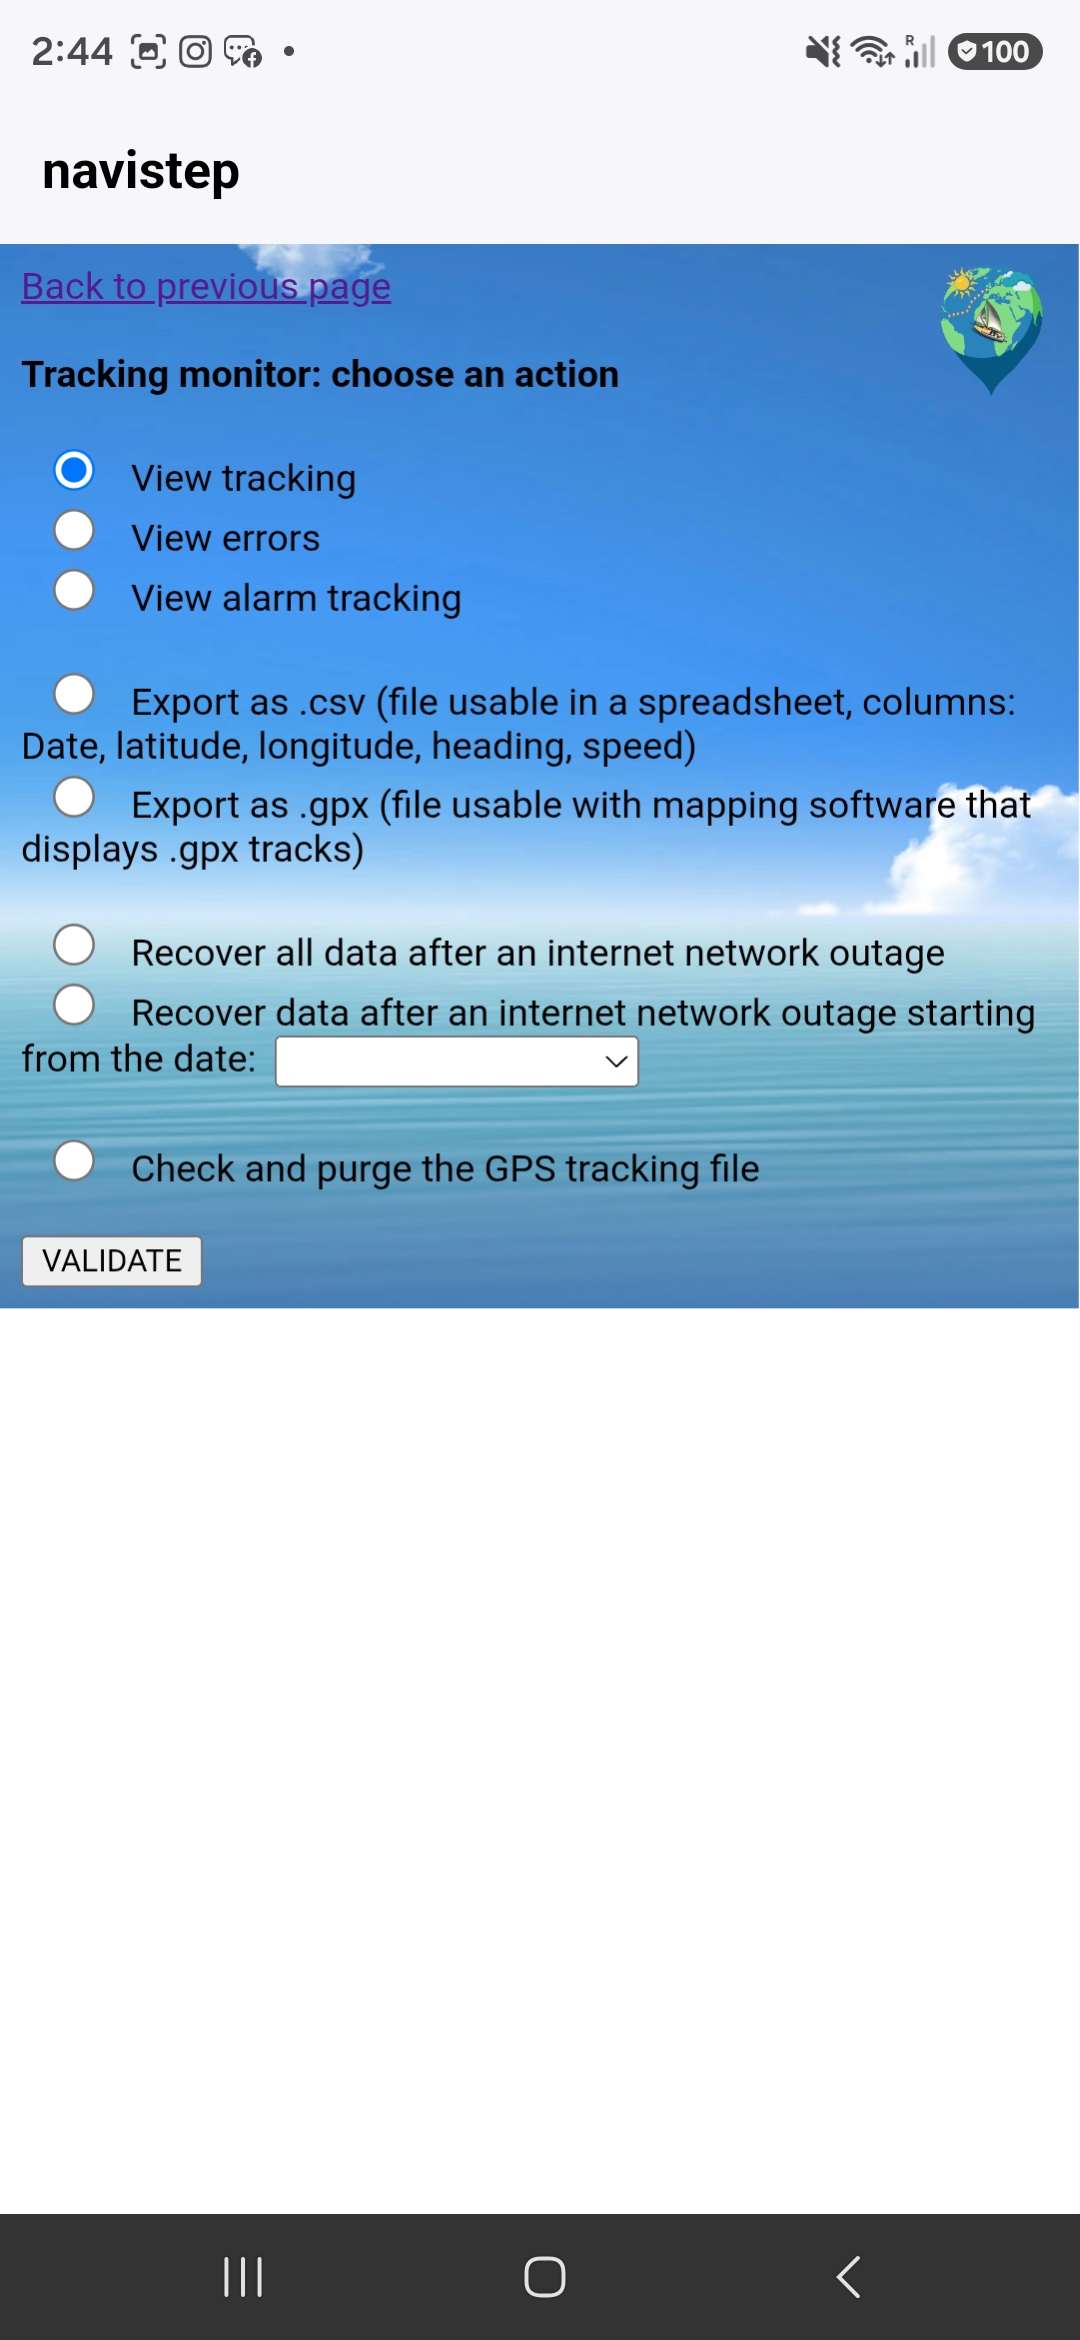
View tracking and View errors display the tracking data (latitude, longitude, date) or errors in text format on a page. The most recent data is always at the beginning. View alarm tracking allows you to view the current alarm tracking file.
Exporting the local tracking file in .CSV format (date, latitude, longitude, speed, heading) allows you to open this navigation log file in a spreadsheet.
Exporting the local tracking file (latitude, longitude, date) in .GPX format generates very light and suitable files. Since the number of GPS points depends on whether the movement is fast or slow, the number of GPS points is never excessively high.
These .gpx files are therefore particularly suitable for use with trip visualization software on maps. Many applications exist, such as Google Earth, VisuGPX, and others.
The small size of these .GPX files makes it possible to generate videos of your trip tracks. To generate videos from Navistep .gpx files, you can use, for example, rumbo.world.
This type of use is much more precise and complete than using Travel Animator or other similar software, which remains very approximate. Here, the .GPX track is followed precisely.
Recovering missing online data is based on the difference between the local tracking file, which is always updated, and the internet data, which is saved only when there is a working internet connection. In the event of a malfunction or temporary internet outage, it is therefore always possible to restore all GPS tracking data to the internet with a slight delay thanks to this local file. There is also an automatic operating mode that does this as soon as the internet connection returns.
It is necessary to validate these settings once before actually starting alarm tracking.
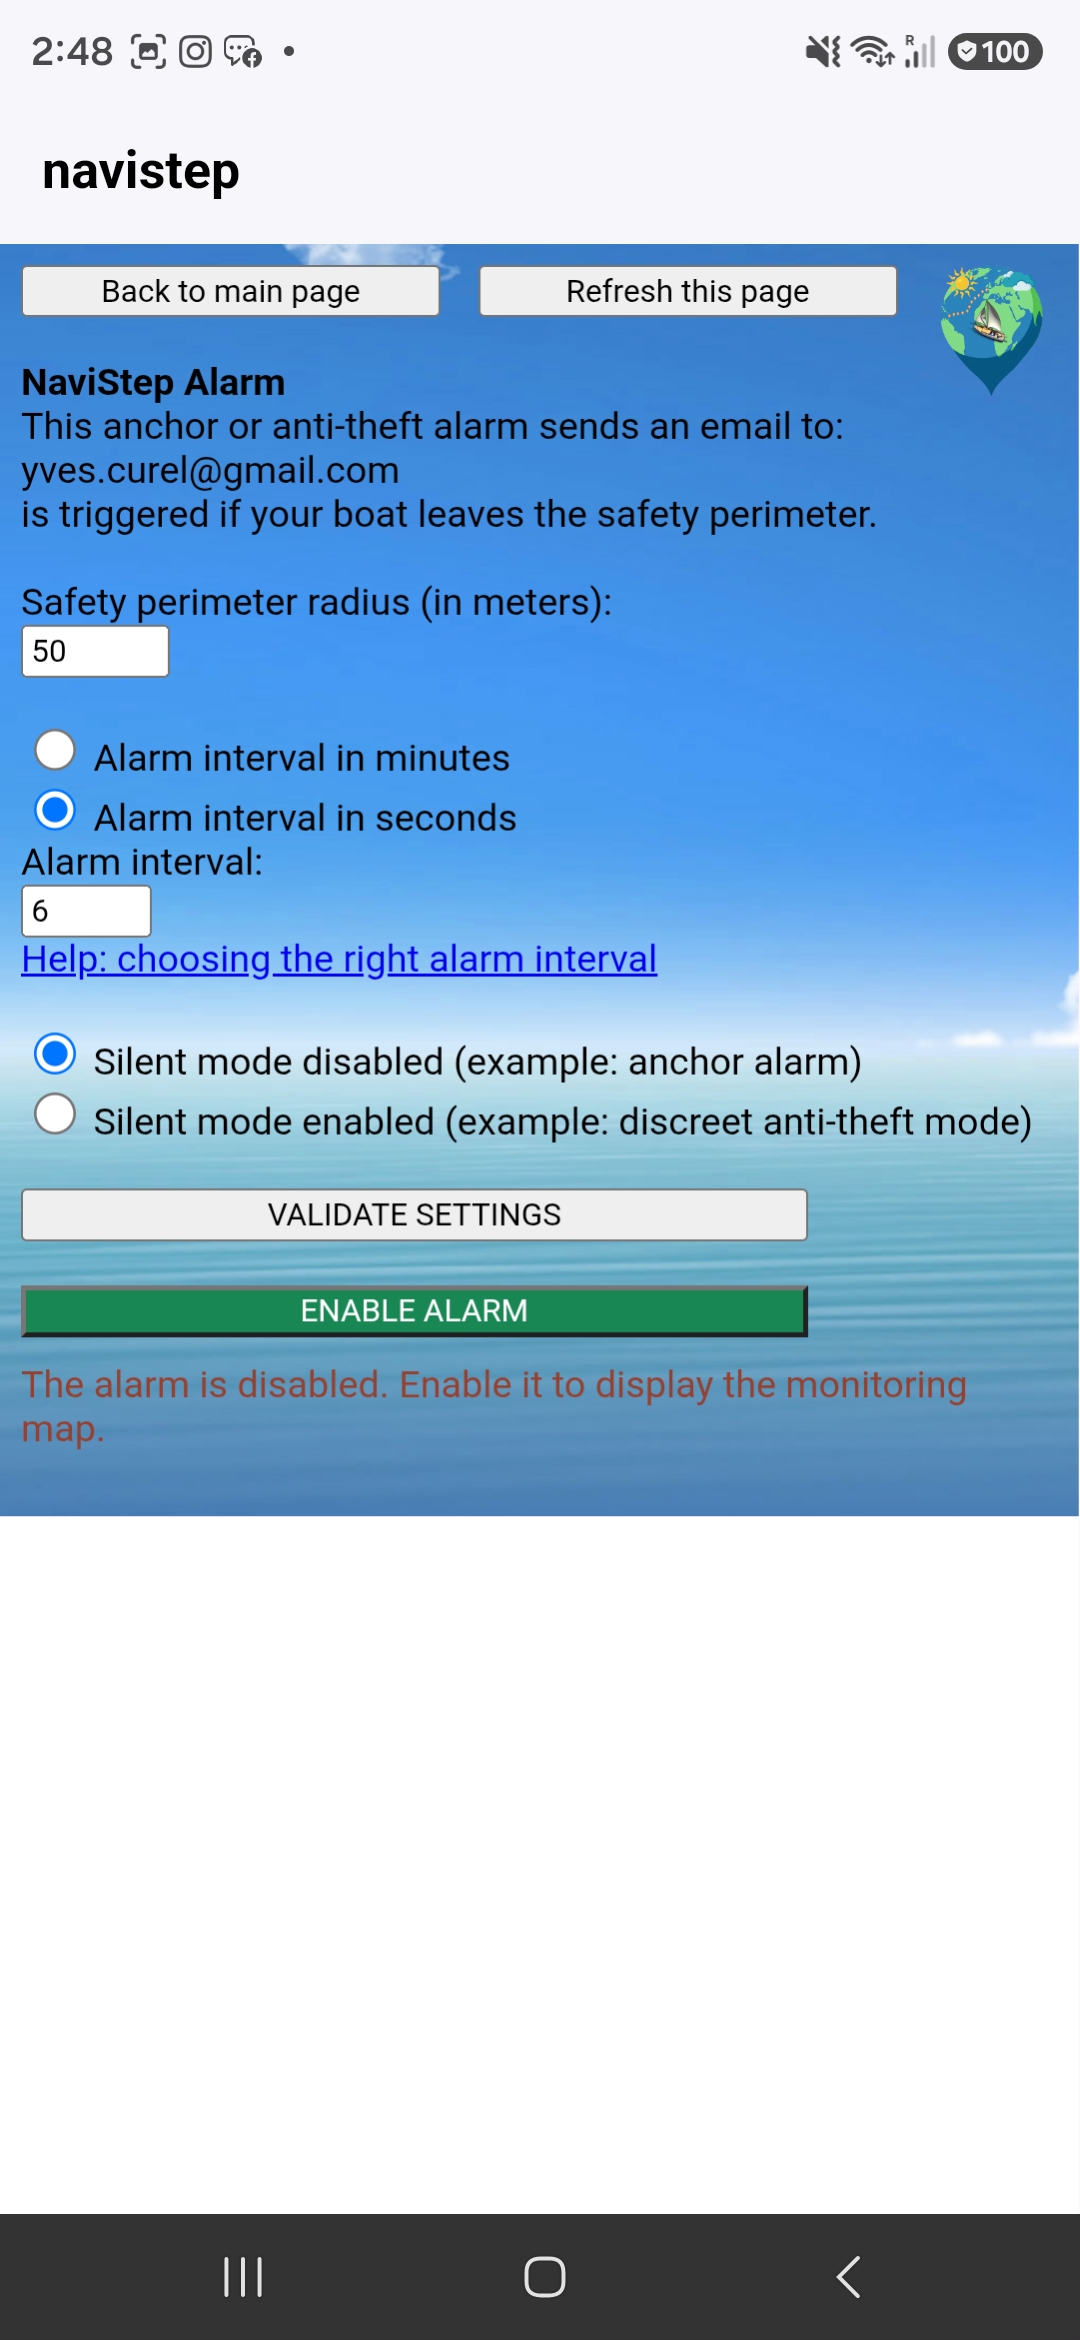
Once these settings have been entered, click VALIDATE SETTINGS. Then, if you click ACTIVATE ALARM, you access the final alarm management page, with a map showing the position of the sailboat relative to its safety perimeter:
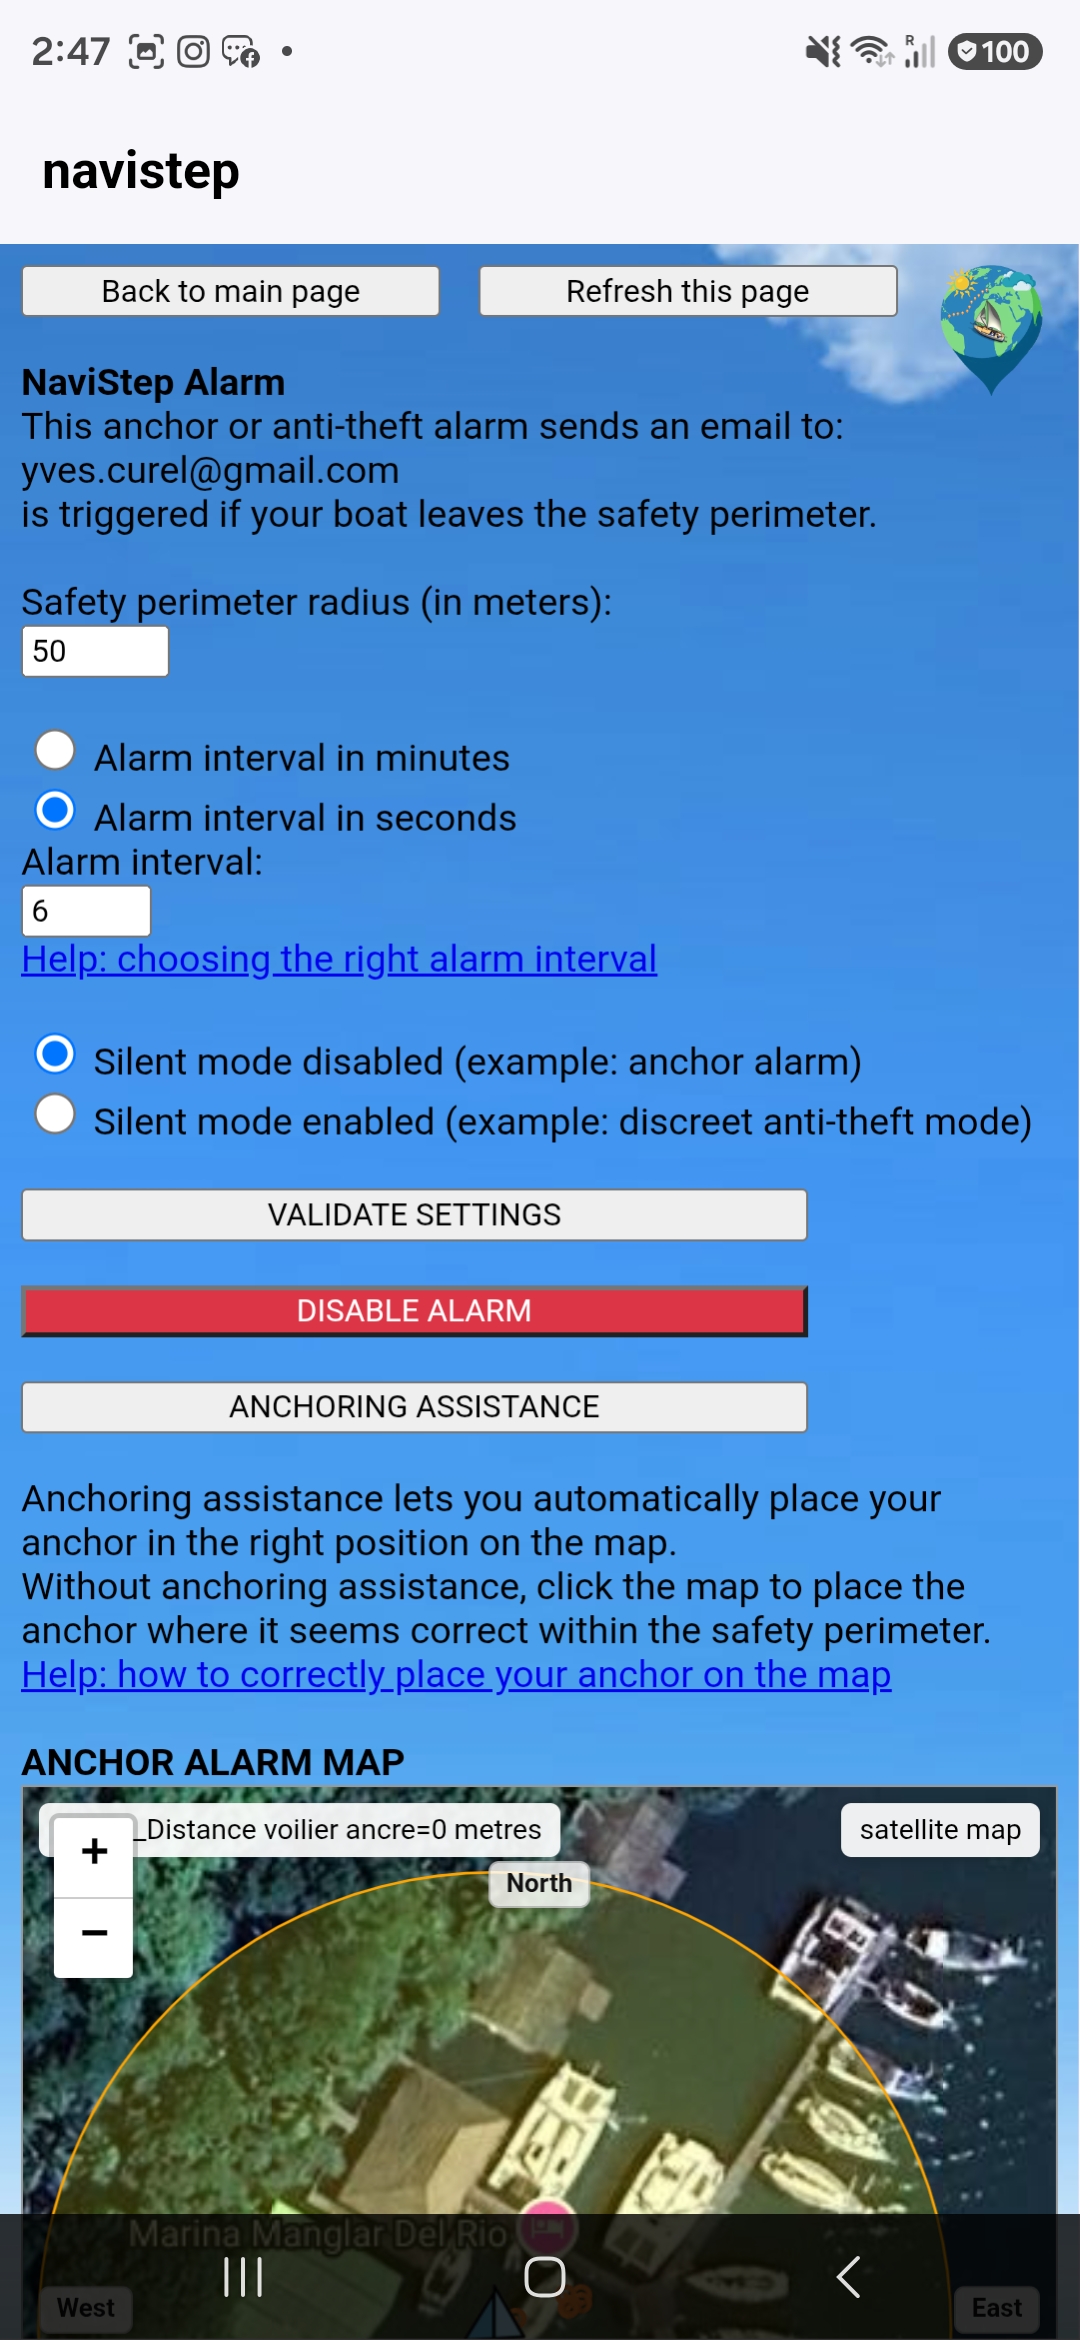
If the Alarm function is activated, the standard trip tracking service is stopped and immediately replaced by this Alarm tracking service.
If the anchor alarm function is stopped, trip tracking resumes automatically. Once trip tracking has restarted, as long as the boat does not move, no point is updated on the internet map of the current track.
Before the anchor alarm actually starts, it is necessary to position the anchor relative to the boat and to the safety perimeter. The anchor position becomes the center of the safety perimeter.
There are two methods: either by clicking inside the safety perimeter area, or by using the anchoring assistance.
By clicking inside the safety perimeter:
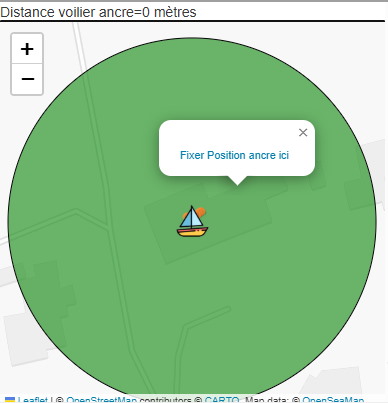
Move to the estimated position of the anchor relative to the boat, then click the button set anchor position here.
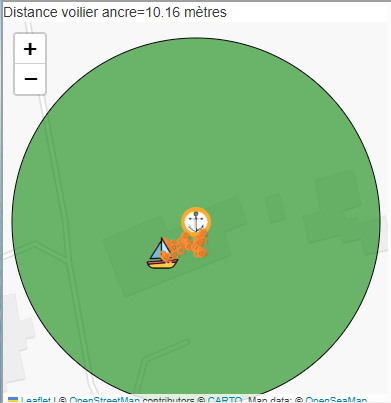
You then obtain this screen, where you can see the track of your boat around the anchor at the center of the safety perimeter, represented by the circle around the anchor.
By clicking the ANCHORING ASSISTANCE button
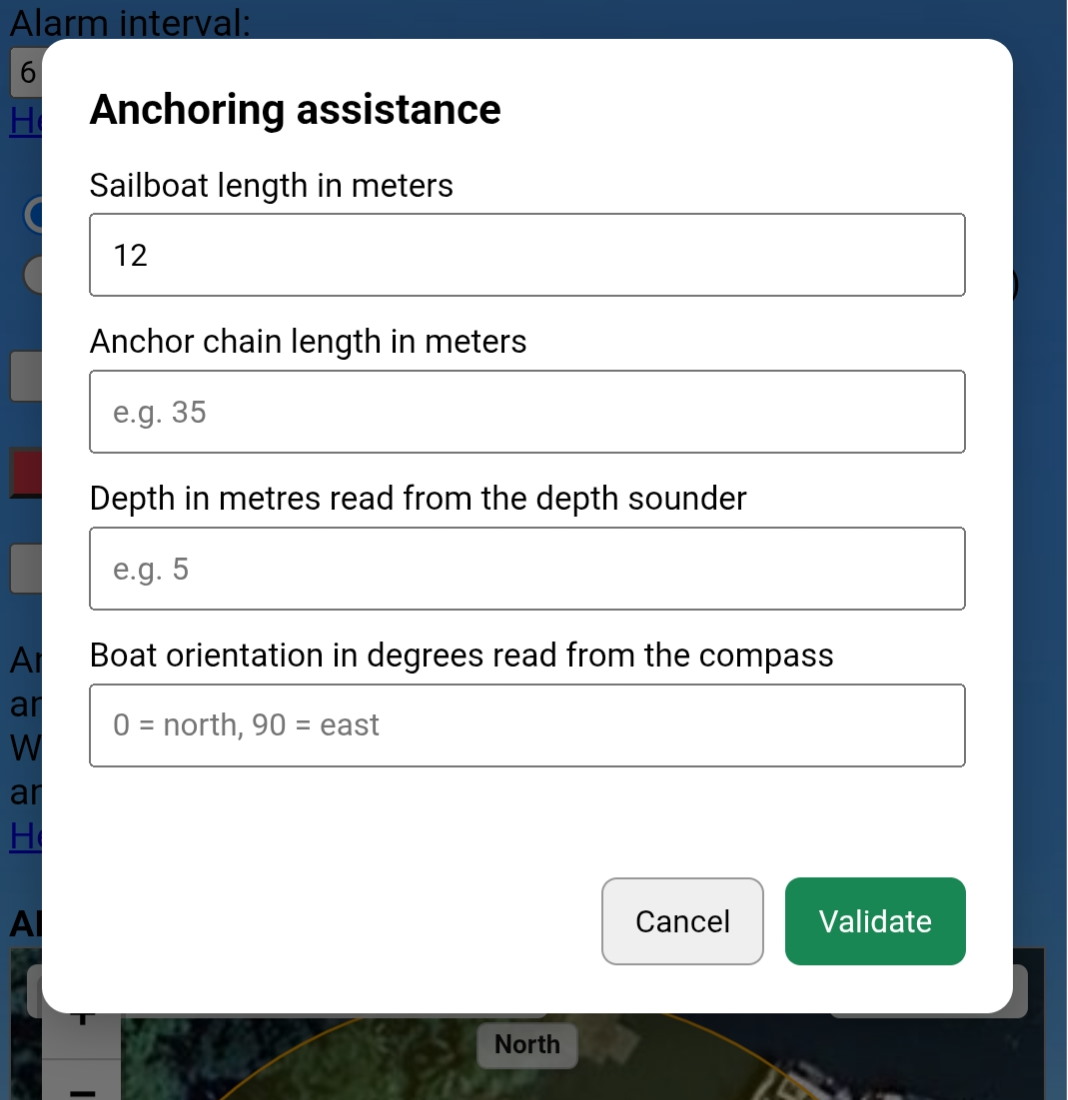
After validating these settings, the anchor is positioned directly on the map in the correct location, at the center of the safety perimeter, with the correct safety perimeter radius.
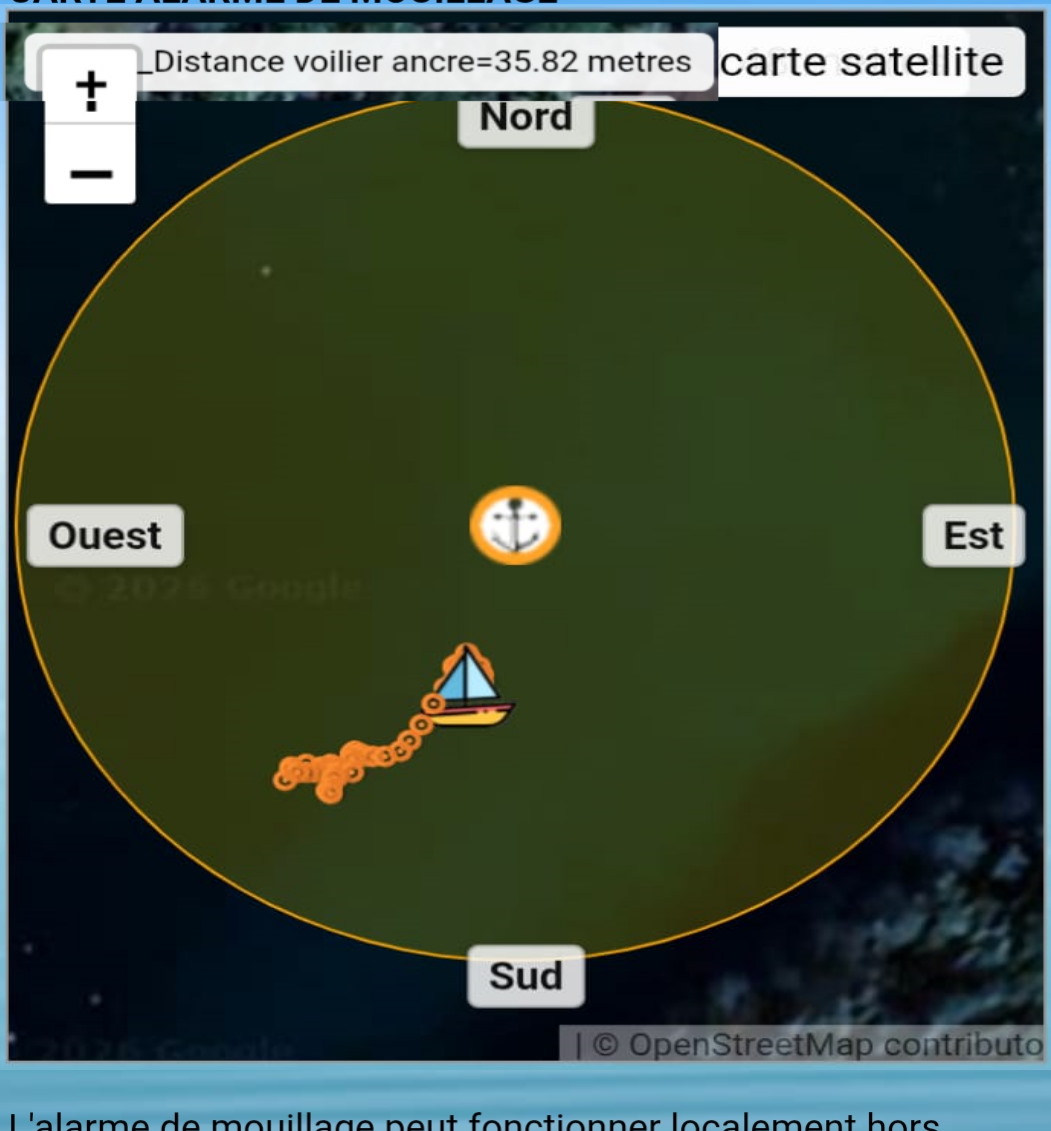
If the boat leaves the safety perimeter, the alarm is triggered.
The frequency is the time interval between two safety perimeter checks. For example, at anchor on a sailboat, an alarm frequency of 6 seconds means that Navistep checks every 6 seconds that the boat has not left the safety perimeter.
Silent mode disabled: the alarm sounds and the alert email is sent.
Silent mode enabled: only the alert email is sent. This is important for a discreet anti-theft alarm when the sailboat remains somewhere for a long period.
To save energy, you can use the anchor alarm without an internet connection, with your internet router switched off at night. In this case, the alarm and its buzzer will still work if the boat leaves the safety perimeter.
A dedicated web page allows you to remotely monitor, on a map, the movement of your boat relative to the safety perimeter. In addition, if the boat leaves the safety perimeter, an alert email is sent automatically.
To use this link in an internet browser when you are away from the boat, before leaving the boat click this button: “copy this internet link for monitoring map”.
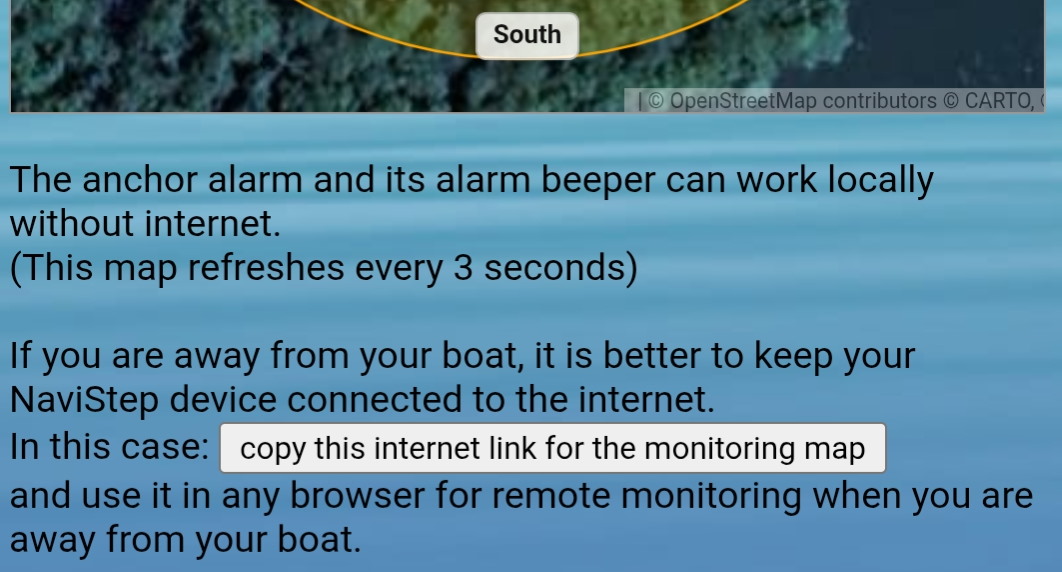
Then paste it into your browser address bar for later use outside the boat. The format of this link is always the same:
https://navistep-marine.web.app/cartealarme.html?user=<your Navistep Identifier>
Yellow WIFI LED on: the local web server for administering Navistep settings is active. This corresponds to the local address, which is always the same: http://10.11.12.13. This URL is the starting point for displaying the Navistep administration pages.
If the yellow LED is off: there is no access to the Navistep Wi-Fi and administration settings. If you want to change Navistep settings, press the shutdown button on the Navistep unit, wait, then cut the power supply and switch it back on.
Orange INTERNET LED on: the Navistep unit is communicating properly with the internet through the internet Wi-Fi router associated with it. You can also share your smartphone internet connection; the smartphone will then act as a Wi-Fi router and can be associated with Navistep.
This means that your successive positions are correctly updated on the internet in “real time” for the people following you.
Orange INTERNET LED off: the Navistep unit no longer has internet access. In this case, the problem usually comes not from the Navistep unit but from your internet Wi-Fi router, which no longer has internet access. It is therefore useless to restart Navistep; you should be patient and wait for your Wi-Fi router to reconnect to the internet. This is the most frequent error case.
In standard trip tracking mode, the local file that records all your GPS points can continue to operate. In this case, do not stop anything on Navistep: as soon as internet access returns, the missing online data will be updated from this local tracking file. So do not stop anything on Navistep and wait until internet access returns on your Wi-Fi router.
In Alarm tracking mode, the sending of alarm emails will not work and the internet tracking map will not be updated, but the audible alarm will still work if the boat leaves the safety perimeter. So, in this case too, do not stop anything on Navistep and wait for internet access to return on your Wi-Fi router.
Green TRACKING LED flashing:
This corresponds to the satellite position acquisition period of the GPS connected to Navistep.
This only occurs when the Navistep unit is powered on. During this time, GPS tracking is not operational. This duration varies from 30 seconds to one or two minutes. If the green light continues flashing, move the GPS of the Navistep unit to another location that is more suitable for better reception.
Green TRACKING LED continuously on:
Normal operation of the standard GPS trip tracking service.
Blue ALARM LED continuously on:
Normal operation of the GPS tracking service in alarm mode. In this case, the standard green tracking LED also remains on.
Blue ALARM LED off:
No active alert tracking.
Green TRACKING LED off:
No active tracking.
Avoid cutting the 12 V power supply directly to Navistep.
To shut down Navistep properly, it is preferable to press the shutdown button for more than one second (long press), then release it. After this long press, the Navistep LEDs remain on for more than fifteen seconds before the Navistep unit shuts down completely. Wait until the LEDs are completely off, then wait another 20 seconds before considering the shutdown complete.
Once the Navistep unit has been shut down with its STOP button, if you want to restart it, you must use an external switch connected to the 12 V supply to fully cut the 12 V power, then switch the Navistep unit back on using the same external 12 V switch.
Saving energy on a sailboat, especially during a long voyage, is very important. Starlink consumes a lot of energy, about 5 Ah or more. By contrast, the Navistep unit consumes very little power, about 0.2 Ah.
How can you use your Navistep tracker intelligently while consuming as little energy as possible?
At night, for obvious energy-saving reasons, Starlink is often switched off, and the anchor alarm is mainly used while sleeping. However, the Navistep anchor alarm can operate without an internet connection. In this case, the anchor alarm no longer updates the online monitoring map and does not send emails. However, it still records data in a tracking file that can be consulted in the local Navistep tracking pages, the small map remains updated in the Navistep administration page, and above all, the buzzer remains active if the boat leaves the safety perimeter.
During an offshore passage, also for obvious energy-saving reasons, you may decide to switch off Starlink at night. In this case, before switching off Starlink, add a short comment that will appear on your online track, indicating that Starlink will be switched off for the night. This reassures the people following you online. GPS tracking continues to operate and continues feeding the tracking file all night. In the morning, as soon as Starlink is switched back on, the data recovery service from the tracking file automatically starts and updates the missing online data. You then once again have complete online tracking, including the night’s route.
During coastal navigation, if you do not have Starlink or if you want to save even more energy by temporarily switching off Starlink, you can use your smartphone internet connection sharing with Navistep. Go to the connection selection menu, then select your smartphone’s shared Wi-Fi connection.